Registering for classes at SPU takes place on a quarterly basis. Registration opens approximately two months before the start of each quarter, and closes by the first day of the quarter (with some notable exceptions). You can find the specific dates on the Academic Calendar. It is important that you follow your program checksheet (or program plan provided by your faculty advisor) to determine the classes you will take each quarter.
Use Time Schedule to find your classes, and then register in Banner using the information you found on each class in Time Schedule (namely, the Course Reference Number, or CRN).
Finding and Logging into Banner
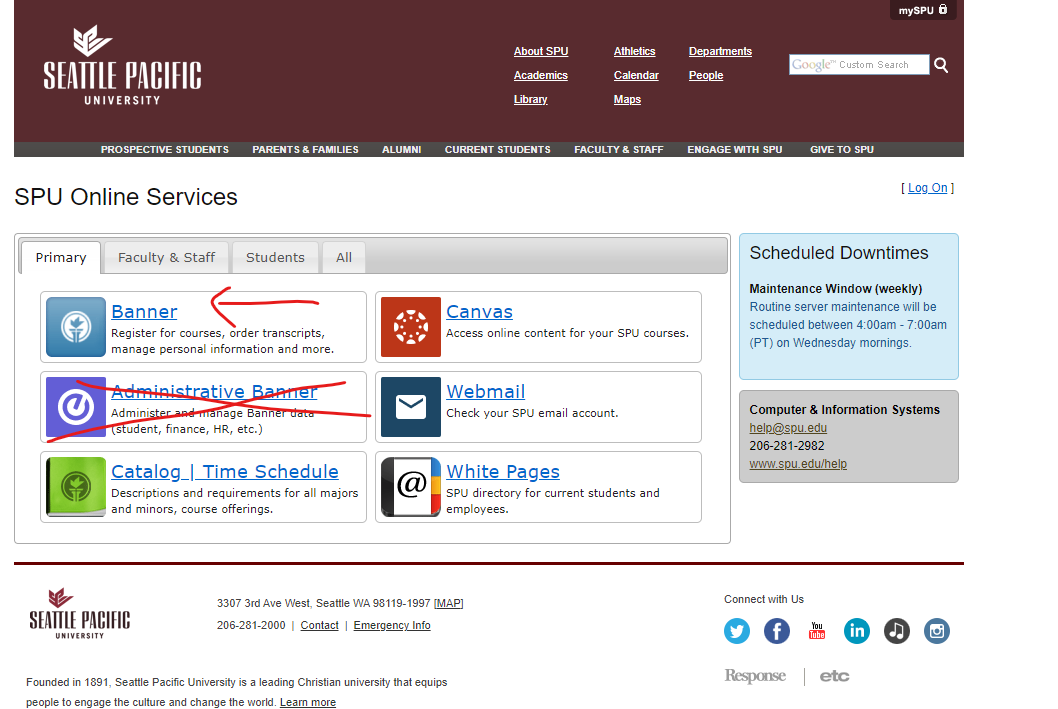
From the SPU homepage, select “mySPU”, then Banner (not Administrative Banner), which will take you to a log-in page. You should use your SPU email address (without “@spu.edu”) as your username and your SPU email password for your password.
Banner Menus
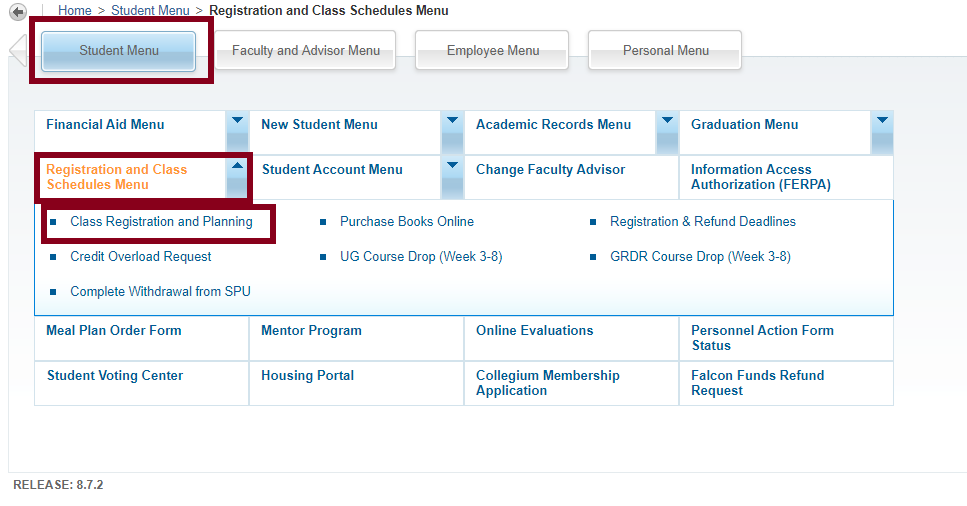
The main page will present you with at least two menus: Student and Personal. A list of the functions of each is noted on that page. For registration, you will use the “Student Menu”. From the Student Menu, select the "Registration and Class Schedules Menu," then “Class Registration and Planning.
Preparing for Registration
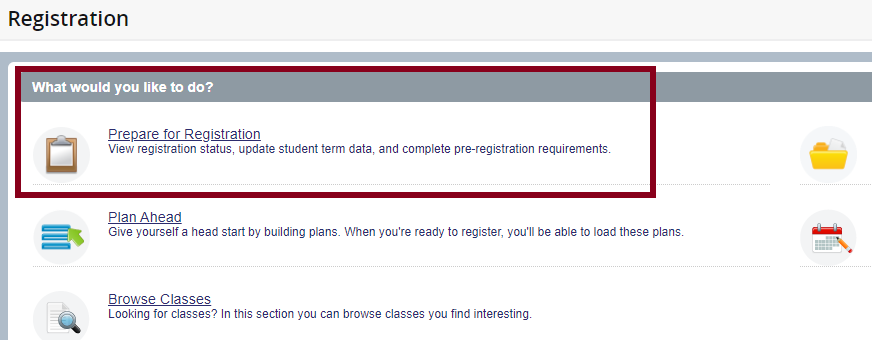
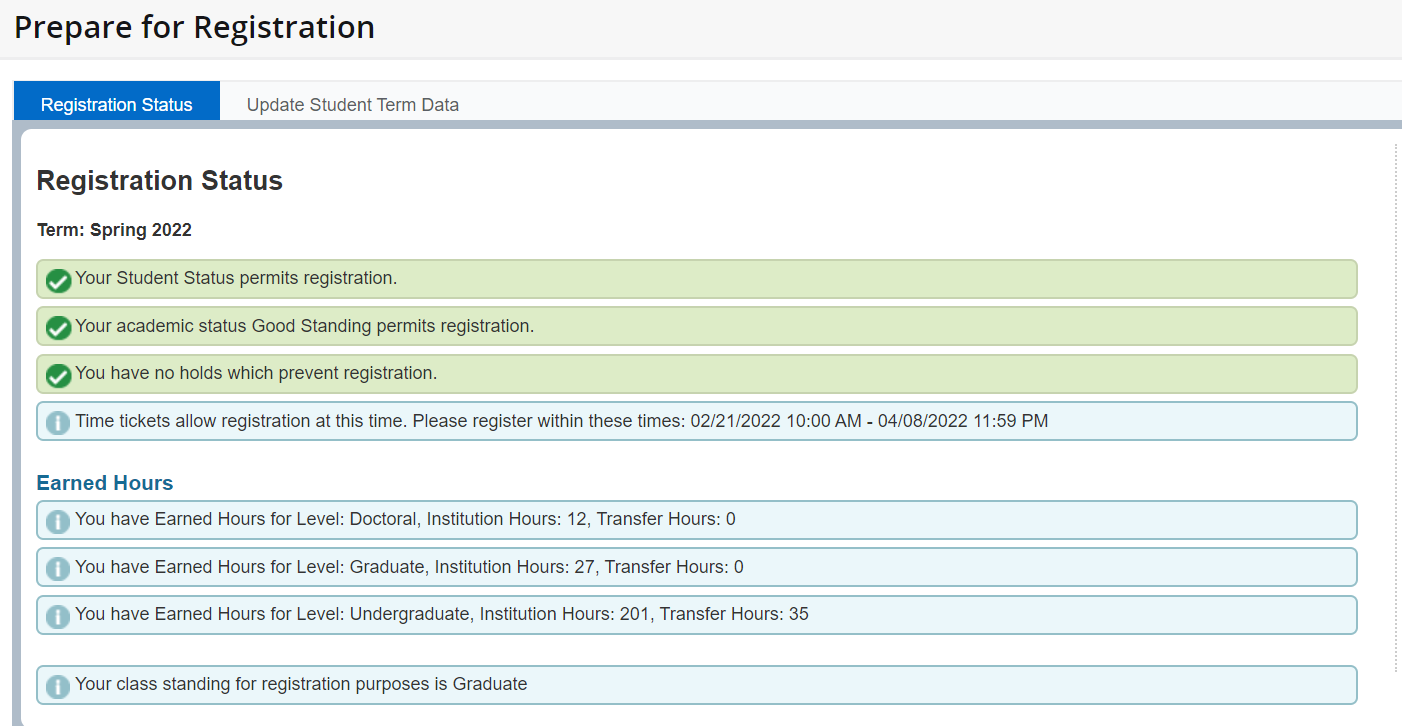
Before you select “Register for Classes”, have a look at the “Prepare for Registration” menu, selecting your intended quarter of enrollment. This page will alert you to anything outstanding in your account which may prevent you from registering in general. You may still run into section level holds.
Note: If you do not have a time ticket listed, please contact the Associate Director of Graduate Programs (soe-grad@spu.edu)
How to Register
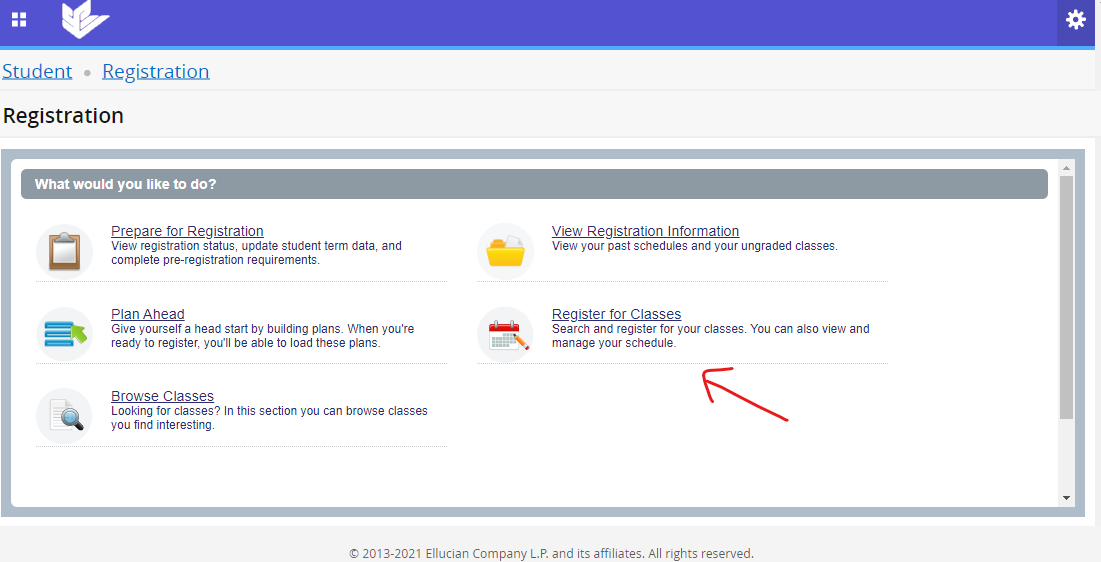
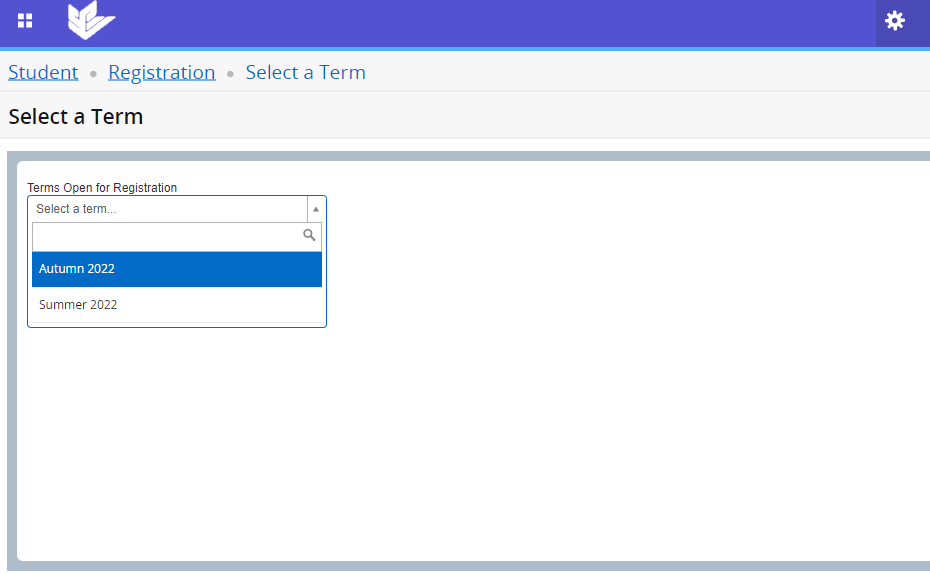
To register, you will need to enter your student menu in banner. In the class registration and planning menu, you will click on the Register for Classes link. If prompted, select the term you are registering for.
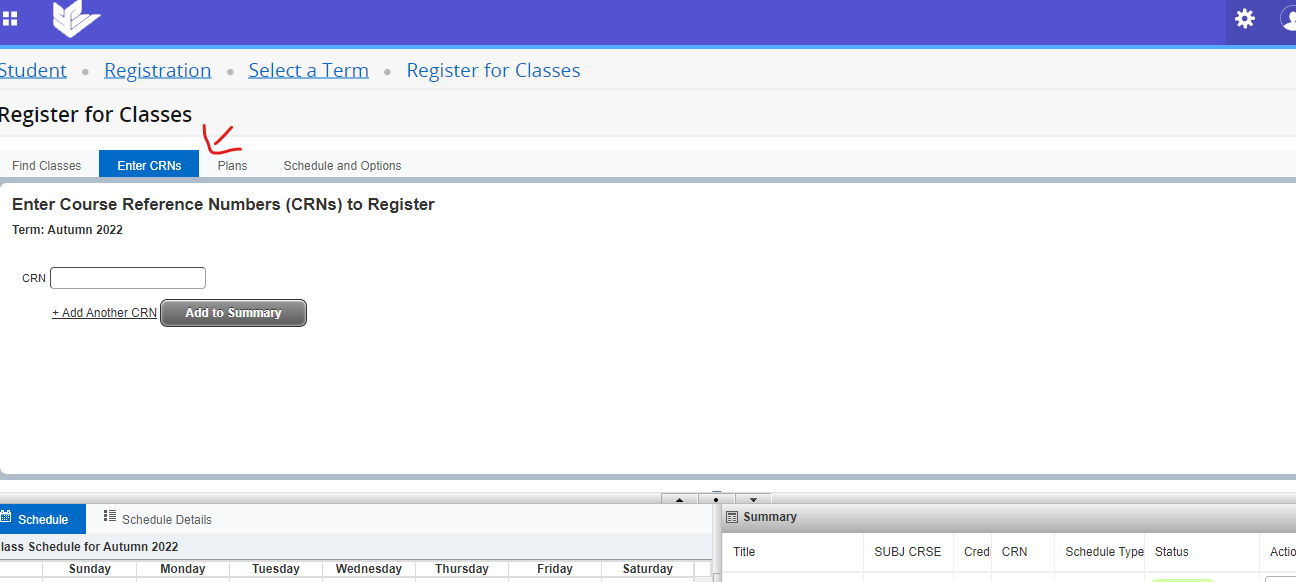
We recommend that students use use the graduate time schedule to find course information including the CRN (computer reference number) which is needed to register for courses. Before registering, collect the CRNs of the classes you need. In the Enter CRNs tab you can enter as many CRNs as you want. If your courses require you to be concurrently registered, you will need to add them at the same time. For more information on how to use the time schedule can be found on the SOE Graduate Time Schedule wiki page.
Additional information provided by the Office of the Registrar can be found on their Registering Resources wiki page.
Registration Errors
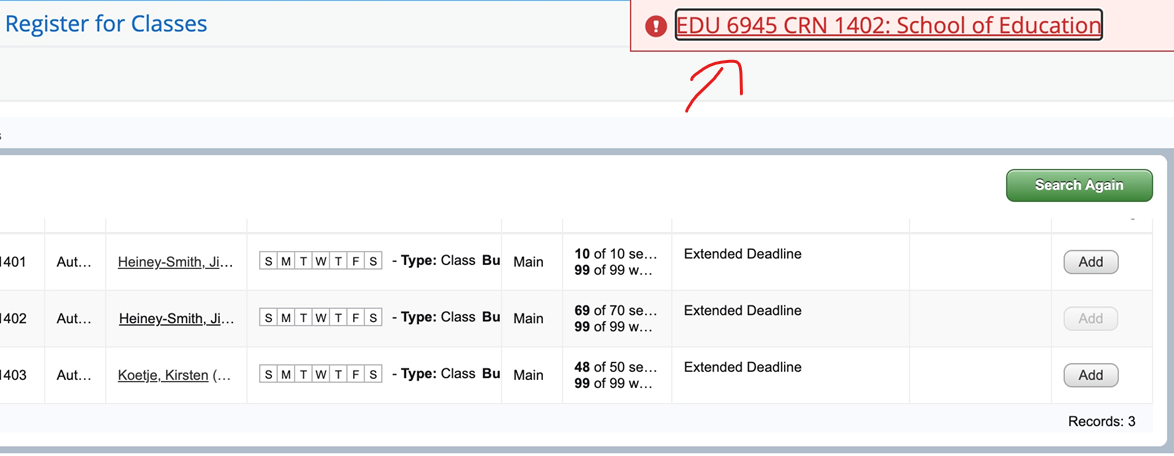
If you receive a registration error, please take a screenshot of the entire error message, including course information with the CRN, into an email with your ID number.
Teacher education students (AMAT, AMTMS, MAT, ARC) should contact the Certification Office with any registration issues. All other graduate and doctoral students should contact the Associate Director of Graduate Programs.
If you are using Windows, you can use the snipping tool or snip and sketch to take a screenshot of the error message. On a Mac you can use Shift+Command+3.
Viewing Your Registration Record
There are three ways you can view your registration record. The first option is to select View Registration Information within the Registration and Class Schedules Menu in Banner. Here are the steps.
- Log into Banner.
- Select the Student Menu.
- Then select the Registration and Class Schedules Menu.
- Choose Class Registration and Planning.
- Then select View Registration Information.
- Select the tab for “Active Registrations”.
- You’ll be able to see your current schedule here, along with any days and times the courses meet.
The second way you can view your registration record is in the same location where you registered. Here are the steps.
- Log into Banner.
- Select the Student Menu.
- Then select the Registration and Class Schedules Menu.
- Choose Class Registration and Planning.
- Then select Prepare for Registration.
- You’ll be able to see your current schedule here, along with any days and times the courses meet.
The third way to view your registration record is through your Student Profile.
- Log into Banner.
- Select the Student Menu.
- Then select the Academic Records Menu.
- Choose Student Profile.
- On the right hand side of the main profile, you will be able to see your current registration record.
- You’ll be able to see your current schedule here.
If you have any questions concerning the registration process, you may reference Student Academic Services FAQ page.
Ordering Textbooks
After registration, you may order textbooks for your course. Keep in mind that if you register early, your instructors may not yet have books on order for the following term. Keep checking back regularly. You can find your textbooks in one of two ways: Banner and Time Schedule.
- In Banner, under the Student Menu, select the Registration and Class Schedules Menu. You will find a link to Purchase Books Online.
- In addition, Time Schedule also holds this information. You can find a link to purchase books via a book icon on the far right hand side of the course information.
Important Dates
View the most recent Academic Calendar for registration and withdrawal deadlines, as well as university events.
Making Changes to Your Registration
Instructions from SAS on Registration Changes including dropping courses and changing variable credits.
Making changes to your registration record past the deadline
Sometimes you will need to make a registration changes past the Banner deadline. You can now request late registration changes directly in Banner! Between weeks 3 and 7 of any quarter, you can petition to drop a class. In this same location, you can also make a credit overload request (a request to take more than 15 credits in any term), apply for a leave of absence (see below), or make a complete withdrawal from the university. You can find these petitions in the Registration and Class Schedules Menu.
Leave of Absence
Students may take a leave of absence for up to three quarters, meaning if the last time you registered was in Autumn 2020, you would need to register again by Autumn 2021, or you will become inactive. Students can submit a Leave of Absence application by going to the Student Menu in Banner, then the Academic Records Menu. This is what you should see.
You may find more information about taking a Leave of Absence, including the university's policies, on Student Academic Service's webpage.
When you submit a Leave of Absence application, please also be sure to alert your program chair about your plans, if you have not already been in communication.
Submitting a Credit Overload Request (taking more than 15 credits in a given quarter)
In the image above, you will see a link to a Credit Overload Request. Please complete this form in Banner if you wish to take more than 15 credits in any given quarter. Please also let your program chair know that you are making this request, and copy Kristi Kanehen on your message. If approved, Student Academic Services will enter the override, allowing you to register for the specific number of credits requested.
