Versions Compared

Key

  • This line was added.
  • This line was removed.
  • Formatting was changed.


Info

Table of Contents

Table of Contents
minLevel3

About

These instructions will walk you through downloading and installing the PaperCut Client for Personal Mac Devices and connect to SecurePrint for submitting print jobs. This process may involve steps that are not familiar to you. Throughout the installation and configuration process, you may be prompted for either your SPU Username and Password (use your full email address) or your computer's local administrative account and password (the one you type to install programs or updates). 

Info
You must be connected to the SPU campus network for these steps to work. Make sure that your Mac is also setup to Install Software from Unidentified Developers.

Overview

  1. Install Printer Drivers.
  2. Install PaperCut Client.
  3. Add the SecurePrint printer.
  4. Instructions for Printing.


Papercut Download Location


Located in-the Download Center: SPU Download Center You will need to sign in with your SPU Credentials to access the download.

Step by Step

System Requirements

Evaluate your system Requirements:

  • Apple macOS 10.14 (Mojave) or Higher
  • Processor: Dual Core 2.0Ghz or higher
  • Memory: Most modern client workstations are configured with 2GB to 4GB of memory, PaperCut requires a minimal 256MB.
  • Hard Disk: 
    • 0MB - zero-install deployment (recommended)
    • 100MB - full local installation
      • Most modern client workstations have 60GB to 250GB of storage available.
    • Microsoft Internet Explorer 11 and above
    • Microsoft Edge
    • Mozilla Firefox 25 and above
    • Apple Safari 9 and above
    • Google Chrome 27 and above


Install Printer Drivers

Inside the extracted PapercutMacClient folder you will find a file named MFP_drivers.dmg. Open it. Run the file MX-C52. It will prompt you through an installer. Will require Administrative approval while installing.


Install PaperCut Client


Info

You may get the error "Install Papercut script can't be opened because it's from an unidentified developer".

Use the following instructions if you get this error.

  1. Open System Preferences -> Security and Privacy
  2. Make sure you are on the General tab.
  3. Change the Allow applications downloaded from: setting to Anywhere (you should change this setting back after you have installed papercut).
  4. Rerun the App. 

Apple Documentation on Safely Opening Apps on your Mac

  1. Run the PCClient Application from the mac folder in the PapercutMacClient folder we downloaded from spu.edu/download.
  2. You may be prompted to "Install PCClient into the Applications folder". Click Yes.

  3. You can verify if Papercut is installed by looking at the top right hand corner of the screen. Papercut is denoted by their P Logo. Below you can see the logo in the Red Square:

    OR
    You can find it located in your applications folder
  4. Next, allow notifications for Papercut. After you install you will see a notification pop on your screen

    Click on it and select Allow Notifications.
    You can navigate here by opening system preferences < Notifications < Scroll down to PCClient < Toggle Allow < Select alert style


Install SecurePrint Printer


  1. Open the Apple Menu -> System Preferences -> Users and Groups and select your username
  2. Select the Login Items tab.
  3. Click the "+" button then navigate to the applications folder in the left-hand pane. Click PCClient, click Add, and then click the checkbox next to PCClient to hide the application when it starts.
  4. Open System Preferences -> Print & Scan
  5. Click the "+" button.
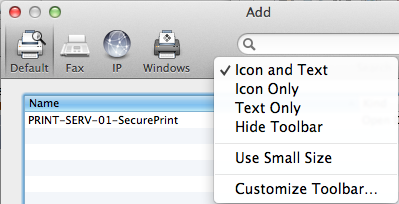
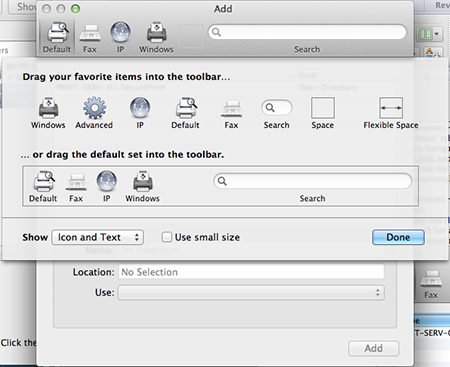
  6. Press the Control Key (ctrl) on your keyboard and click on the grey menu header between the "Windows" icon and the search bar. In the context menu that opens, select Customize Toolbar.


  7. Click and drag the Advanced (gear) icon from the window that appears onto your menu bar (next to the "Windows" icon) and select done.


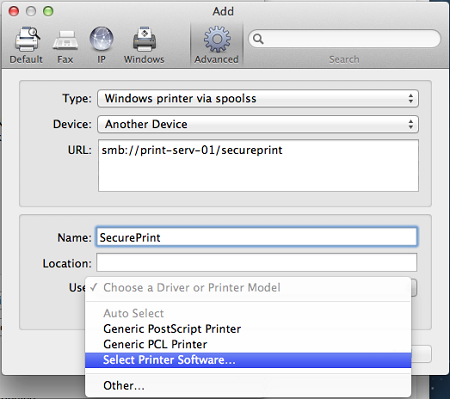
  8. Click Advanced and give the computer approximately a minute or so to search for printers. The manual entry screen will then appear.
  9. Choose Windows Printer Via Spools.
  10. Enter "smb://print-serv-01/secureprint" in the URL as shown below:


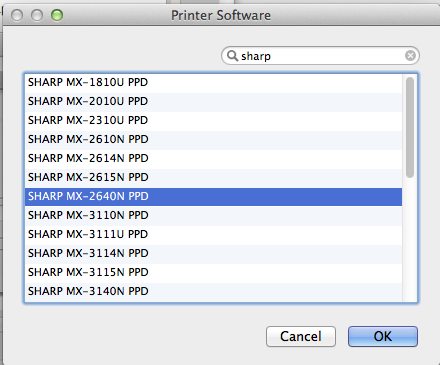
  11. Choose Select Printer Software... from the Use drop-down. Find and use the SHARP MX-3070V PPD driver as shown below.


  12. Choose OK and then click Add.
  13. Configure printer options for the MFP outlined below, then press OK when finished:
    1. Input Tray Options: Three Trays
    2. Output Tray Options: Finisher
    3. Right Tray: Installed
    4. All other fields should be left alone with their default settings

  14. If you changed your security settings to allow applications from unknown developers (Step 5), use the following instructions to set them back:
    1. Open System Preferences -> Security and Privacy.
    2. Make sure you are on the General tab.
    3. Change Allow applications download from: to Mac App Store and Identified Developers.

  15. Log off of your computer and log back on. The Papercut client will start in minimized mode.


Instruction for Printing

  1. Print a document to SecurePrint as you would to any other printer.
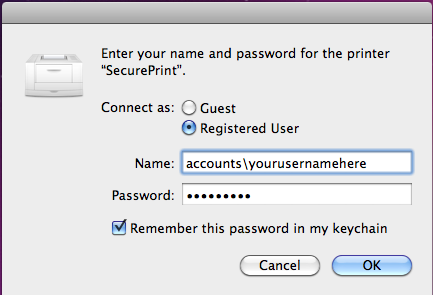
  2. You will be prompted for your SPU Username and password. In the username field, put accounts\yourusername and enter your password in the password field. Be sure to check "remember this password in my keychain" if you don't want to be prompted again.


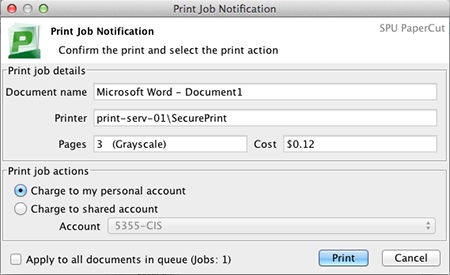
  3. Be sure to wait for the Papercut dialog box to appear and click Print.


  4. Release your printed job from the printer.

For more information on the SecurePrint printer, visit our SecurePrint Instructions page.


Related articles

Filter by label (Content by label)
showLabelsfalse
max5
spacesHKB
showSpacefalse
sortmodified
reversetrue
typepage
cqllabel in ("software","papercut","download-center","mfp") and type = "page" and space = "HKB"
labelsmfp software download-center papercut